 Every test is associated with the child’s emotions – so how should we prepare so that everything goes smoothly? It’s advisable to bring all previous results from any ophthalmologic and health examinations, previous prescriptions for glasses and any information from hospital. The attitude of the young patient and the parents is also very important! The test is non-invasive, and only requires concentration and a smile. It’s best for the patient if he or she is relaxed.
During vision screening (also at our office) we offer: An examination to detect hidden and visible strabismus, a test to differentiate colours, an examination of binocular vision, a measurement of the angle of strabismus using Synopthophore, and an examination of visual acuity for nearsightedness and farsightedness.
A test for nearsightedness and farsightedness– what does it mean in practice?
#1 Examination of visual acuity for farsightedness
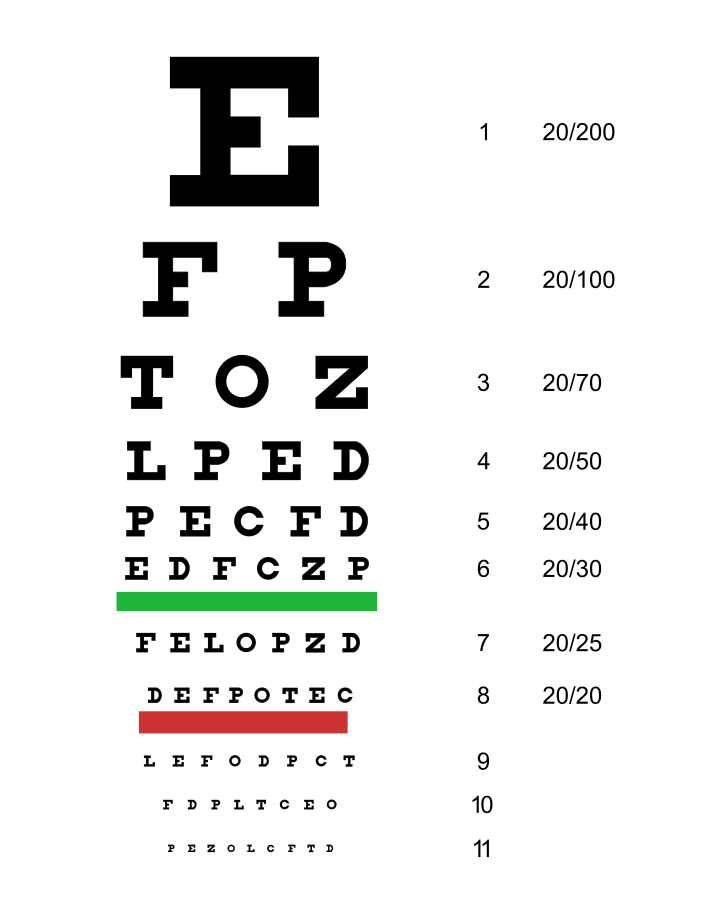
“Distance” mean herein a distance of five metres, but in the case of children it is a distance of three to four metres. The aim of the examination is to assess the resolving power of the retina – in other words, the ability to perceive two objects close to each other as being separate objects. A Snellen chart is used in this test. Symbols are arranged in rows and their size decreases with each successive row.


With each row of symbols there is an indication of the distance in metres (D) from which a healthy eye should clearly see them. Strength of visual acuity is expressed by the ratio of the distance at which the child is standing from the table (D) to the distance from which a healthy eye would see the symbol, and the result is expressed as a fraction. In other words:
The numerator is the distance from which the respondent reads an optotype (D). The denominator is the value shown on the last series of optotypes read by the patient (this is the distance at which the child should recognise the symbols if he/she has full visual acuity).
For example, if a patient from a distance of five metres can read the lowest row labelled D-5, then he/she has full visual acuity: 5/5. Whereas, if he/she can only read optotypes in the first uppermost row of the chart, visual acuity would be 5/50, and as a decimal figure, 0.1. If, however, the patient starts to correctly identify most of the optotypes from a distance of two metres, then the visual acuity would be 2/50; 0.4.
2. The patient covers an eye with an arched hand: if the left eye is being examined the patient covers the right eye, and similarly, if the right eye is being examined, the left eye is covered.
3. Starting from the top the patient reads the symbols (letters or pictures), from the largest to the smallest indicated by the ophthalmologist (each eye must be examined separately).
4. The ophthalmologist records the smallest row that the patient read correctly. As mentioned before, the result is recorded as a fraction for each eye separately – in the numerator the distance from which the patient reads the symbols, and in the denominator the number indicating from what distance the signs should be read (at the correct strength of visual acuity) e.g. 5/10
• Visual acuity of the right eye – visus oculi dextri (v.o.d.) =1.0,
• Visual acuity of the left eye – visus oculi sinistri (v.o.s.) = 1.0.
See how Peppa Pig is doing during an examination of visual acuity for farsightedness:
In extreme cases, where the patient has really poor visual acuity the ophthalmologist will examine the patient’s sense of light using a strong flashlight. If it turns out that the eye has no sense of light, the ophthalmologist will write: total blindness.
#2 Examination of visual acuity for nearsightedness
The examination of visual acuity for nearsightedness involves reading from a distance of 30-35 cm (each eye separately) a standardised text from a Snellen chart for nearsightedness. Instead of letters, pictures are used during an examination of younger patients. The signs are in decimal format, and are used to determine the power of vision while reading up close.

Najnowsze komentarze